openocd深入体验 (一)编译openocd
前言
openocd是一款开源的调试工具,当使用非mdk作为开发环境的时候会用到它。
如果你有一块热门的板子可以通过以下配置启动openocd:
openocd -f board/stm32f4discovery.cfg
如果你是特定的调试器interface
和特定的目标芯片target
:
openocd -f interface/ftdi/jtagkey2.cfg -c "transport select jtag" \
-f target/ti_calypso.cfg
或
openocd -f interface/stlink.cfg -c "transport select hla_swd" \
-f target/stm32l0.cfg
这部分支持的interface
和target
可以从/tcl/interface
和/tcl/target
目录下获取。
以常见的jlink调试stm32f103为例,下面就是对应的两个cfg文件:
stm32f10x.cfg
# SPDX-License-Identifier: GPL-2.0-or-later
# script for stm32f1x family
#
# stm32 devices support both JTAG and SWD transports.
#
source [find target/swj-dp.tcl]
source [find mem_helper.tcl]
if { [info exists CHIPNAME] } {
set _CHIPNAME $CHIPNAME
} else {
set _CHIPNAME stm32f1x
}
set _ENDIAN little
# Work-area is a space in RAM used for flash programming
# By default use 4kB (as found on some STM32F100s)
if { [info exists WORKAREASIZE] } {
set _WORKAREASIZE $WORKAREASIZE
} else {
set _WORKAREASIZE 0x1000
}
# Allow overriding the Flash bank size
if { [info exists FLASH_SIZE] } {
set _FLASH_SIZE $FLASH_SIZE
} else {
# autodetect size
set _FLASH_SIZE 0
}
#jtag scan chain
if { [info exists CPUTAPID] } {
set _CPUTAPID $CPUTAPID
} else {
if { [using_jtag] } {
# See STM Document RM0008 Section 26.6.3
set _CPUTAPID 0x3ba00477
} {
# this is the SW-DP tap id not the jtag tap id
set _CPUTAPID 0x1ba01477
}
}
swj_newdap $_CHIPNAME cpu -irlen 4 -ircapture 0x1 -irmask 0xf -expected-id $_CPUTAPID
dap create $_CHIPNAME.dap -chain-position $_CHIPNAME.cpu
if {[using_jtag]} {
jtag newtap $_CHIPNAME bs -irlen 5
}
set _TARGETNAME $_CHIPNAME.cpu
target create $_TARGETNAME cortex_m -endian $_ENDIAN -dap $_CHIPNAME.dap
$_TARGETNAME configure -work-area-phys 0x20000000 -work-area-size $_WORKAREASIZE -work-area-backup 0
# flash size will be probed
set _FLASHNAME $_CHIPNAME.flash
flash bank $_FLASHNAME stm32f1x 0x08000000 $_FLASH_SIZE 0 0 $_TARGETNAME
# JTAG speed should be <= F_CPU/6. F_CPU after reset is 8MHz, so use F_JTAG = 1MHz
adapter speed 1000
adapter srst delay 100
if {[using_jtag]} {
jtag_ntrst_delay 100
}
reset_config srst_nogate
if {![using_hla]} {
# if srst is not fitted use SYSRESETREQ to
# perform a soft reset
cortex_m reset_config sysresetreq
}
$_TARGETNAME configure -event examine-end {
# DBGMCU_CR |= DBG_WWDG_STOP | DBG_IWDG_STOP |
# DBG_STANDBY | DBG_STOP | DBG_SLEEP
mmw 0xE0042004 0x00000307 0
}
tpiu create $_CHIPNAME.tpiu -dap $_CHIPNAME.dap -ap-num 0 -baseaddr 0xE0040000
lappend _telnet_autocomplete_skip _proc_pre_enable_$_CHIPNAME.tpiu
proc _proc_pre_enable_$_CHIPNAME.tpiu {_targetname} {
targets $_targetname
# Set TRACE_IOEN; TRACE_MODE is set to async; when using sync
# change this value accordingly to configure trace pins
# assignment
mmw 0xE0042004 0x00000020 0
}
$_CHIPNAME.tpiu configure -event pre-enable "_proc_pre_enable_$_CHIPNAME.tpiu $_TARGETNAME"
jlink.cfg
# SPDX-License-Identifier: GPL-2.0-or-later
#
# SEGGER J-Link
#
# http://www.segger.com/jlink.html
#
adapter driver jlink
# The serial number can be used to select a specific device in case more than
# one is connected to the host.
#
# Example: Select J-Link with serial number 123456789
#
# adapter serial 123456789
我在之前使用体验中,很快就用官方给的例子,成功调试起了STM32的单片机,毕竟东西能跑,也不曾细究原因。
可是心里的疑惑无法解答。
例如jlink.cfg
里面这一行代码:
adapter driver jlink
adapter是啥? 这个dirver又是啥?为啥可以这样子写?
心里会疑惑,如果我有一个完全新的芯片,市面上从来没有出现的芯片那么应该如何写呢?
本文的目的就是个解释上面这个问题,预计目标是看完这篇文章的小伙伴,可以为自己的芯片写对应的openocd配置。
正好我有手头上申请了几片国产的领芯微的MCU(LCM32F039),这款芯片原厂给的开发方式只适配了MDK。
它的寄存器也不是照抄STM32的,所以无法直接用ST的下载算法,那么我们以这颗芯片为例子,一起看看openocd到底是如何工作的。
介绍tcl
其实openocd采用了一个叫tcl的脚本语法,之前的那些cfg配置都是tcl语法的文件,去解析tcl从而实现了下载不同的芯片,选取不同的接口。
例如下面这行脚本实现的一个烧录功能,都是要到tcl的解释器里面去解析执行的。
flash bank $_FLASHNAME stm32f1x 0x08000000 $_FLASH_SIZE 0 0 $_TARGETNAME
那么我们很自然的就产生了一个疑问,如果这个芯片是从世界上刚刚诞生,从来没出现过。我应该怎么加下载算法呢?
这部分疑惑,我是在阅读了openocd的源码之后,才得以解除的。
它的源码和tcl脚本解释器是一一对应的,阅读源码,就可以了解到cfg文件应该怎么写了。
也就是说,你要加下载算法,就需要自己添加C文件,并且重新编译openocd。
所以我们先来看看如何编译openocd,至于到底tcl和C文件是如何对应的,我放到后面再讲。(我推荐大家能看懂源码的直接看源码,我写的罗里吧嗦的还会有疏漏,如果觉得看源码找不到头绪,再来看我的文字,我相信看过源码之后,对cfg文件应该怎么写,就不会再像之前那样子云里雾里了。)
编译原始的openocd
笔者要在windows下使用openocd,所以采取了MSYS2的方式。(Ubuntu下可以直接按照文档操作编译,但是Windows下的坑略多)
NoteMSYS2安装的时候会卡在50%处,此时断网等待约1分钟即可
在vscode的终端中配置msys2,msys2有四个环境可以选择,我们这里选择mingw64。
{
"terminal.integrated.profiles.windows": {
"MSYS2": {
"path": "C:\\msys64\\msys2_shell.cmd",
"args": [
"-defterm",
"-no-start",
"-here",
"-mingw64",
],
"icon": "terminal-bash",
}
},
}
安装依赖&克隆仓库
先更新源再去安装依赖
pacman -Syu
pacman -Su
pacman -S base-devel mingw-w64-x86_64-libjaylink mingw-w64-x86_64-toolchain git autogen autoconf automake libtool pkg-config
编译jimtcl
git clone https://github.com/msteveb/jimtcl
cd jimtcl
./configure
make
make install
echo 'export PKG_CONFIG_PAHT=/usr/local/lib/pkgconfig:$PKG_CONFIG_PATH'>>~/.bashrc
export PKG_CONFIG_PAHT=/usr/local/lib/pkgconfig:$PKG_CONFIG_PATH
成功后 可以用pkg-config命令找到jimtcl
pkg-config --libs jimtcl
编译openocd
git clone https://git.code.sf.net/p/openocd/code openocd-code
cd openocd-code
安装对应的USB支持
pacman -S mingw-w64-x86_64-hidapi mingw-w64-x86_64-libusb
编译
./bootstrap
./configure --prefix=/usr/local --enable-jlink --enable-stlink --enable-cmsis-dap
make
make install
问题1:jimtcl is required but not found via pkg-config and system includes
我们把local环境临时添加进去即可
export PKG_CONFIG_PATH=/usr/local/lib/pkgconfig:$PKG_CONFIG_PATH
输入下面这行命令,可以找到jimtcl就行
pkg-config --libs jimtcl
总结
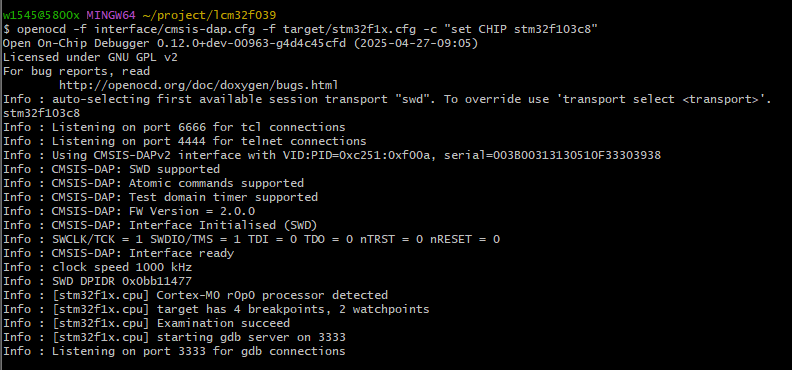
至此为止我们成功在windows上编译了openocd。

刚编译出来的openocd